1. Observer
1.1. Introduction
From the Book :
Define a one-to-many dependency between objects so that when one object changes state, all its dependents are notified and updated automatically.
This pattern is often associated with GUI's , however, other scenarios can be imagined. E.g. iText uses this pattern to generate one or more documents.
Sometimes business logic encapsulated in a class will be polluted with code that is responsible for changing the UI , and since user interfaces tend to have lots of code, this can make maintenance and reuse completely impractical. The Observer pattern offers an alternative. A well defined interface limits the ways in which the model interacts with the user interface.
This design pattern is widely used in the Swing library.
1.2. Example - A Calculator
We will implement a simple calculator. However there is a little twist on this one: we could open as much displays as we like, that are "magically" synchronized with the underlying model.
To show why this is worth the trouble, we implemented two distinct displays: a classical one right above the keyboard and one that keeps track of the actions on a paper like widget.
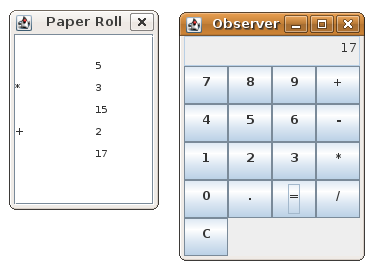
On this image you see the result of typing "5*3+2=", the normal display shows the end result, the paper roll shows intermediate results as you click the buttons.
When you use longer numbers, the paper roll waits until each digit has been entered, while the display interactively shows each digit or decimal being entered.
We could still improve a little by not accepting more than one decimal input, or fine tuning the user interface. But let's not get carried away too much.
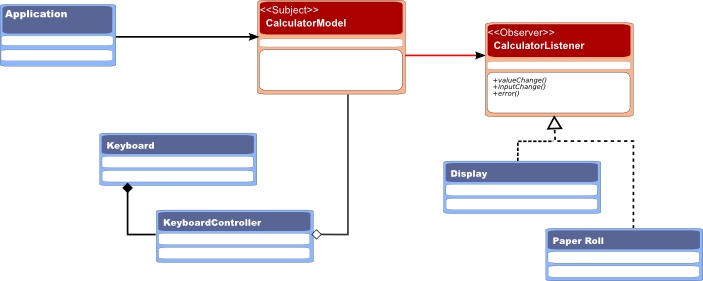
Here is the bigger picture of how the different classes work together:
- A user clicks on the buttons of the Keyboard
- The KeyboardController uses the character on the button to decide how to manipulate the CalculatorModel
- The CalculatorModel updates it's observers after changes are applied
- The Display and PaperRoll use that information to change their appearance.
1.2.1. Code - The Model
Let us first introduce the interface each observer of our model has to implement. CalculatorListener declares three methods that represent the Update method in the original pattern.
In Java it is customary to call the observer 'Listener'. Often the 'update' methods will contain one or more parameters, sometimes the source of the update (in this example that would be the instance of CalculatorModel ) and often these parameters are grouped in an XxxEvent class (here that would have been CalculatorEvent ) which is great for keeping a stable design - you can always add some extra properties without affecting the update method's signature.
The actual Observer or Listener is sometimes referred to as a 'Callback'. Although I suspect this is originates from a C and C++ custom, and is not as common in Java.
package be.ooxs.examples.designpatterns.observer;

public interface CalculatorListener {

	public void valueChange(Value register, Operation operation);

	public void error(String message);

	public void inputChange(String string);

}
Next we'll take a look at the thing our Observers are interested in: the Subject or Observable . In an MVC context that would be called the model or sometimes a bean (Spring, EJB,...)
Our CalculatorModel is responsible of maintaining its internal state, offering methods that allow interacting with it and finally, triggering updates of the observers for changes to the internal state.
package be.ooxs.examples.designpatterns.observer;

import java.util.ArrayList;
import java.util.List;

public class CalculatorModel {
	private Value register;
	private Operation operation;
	private StringBuilder input = new StringBuilder();

	private List<CalculatorListener> listeners = new ArrayList<CalculatorListener>();

	public void add(CalculatorListener listener) {
		listeners.add(listener);
	}

	public void remove(CalculatorListener listener) {
		listeners.remove(listener);
	}

	public void add(CharSequence c) {
		input.append(c);
		fireInputChange();
	}

	public void enterA() {
		if (input.length() == 0) {
			fireErrorChange("No first operand available");
		} else {
			register = new Value(input);
			input.setLength(0);
			fireValueChange();
		}
	}

	public void enterB() {
		if (operation == null) {
			fireErrorChange("Operation?");
		} else if (register == null) {
			fireErrorChange("First Operand?");
		} else if (input.length() == 0) {
			fireErrorChange("Second Operand?");
		} else {
			Value second = new Value(input);
			input.setLength(0);
			fireValueChange(second);
			register = operation.calculate(register, second);
			operation = null;
			fireValueChange();
		}
	}

	public void addOperation(String name) {
		if ("+".equals(name)) {
			operation = new Add();
		} else if ("-".equals(name)) {
			operation = new Subtract();
		} else if ("*".equals(name)) {
			operation = new Multiply();
		} else if ("/".equals(name)) {
			operation = new Divide();
		}
	}

	public void clear() {
		register = null;
		input.setLength(0);
		operation = null;
		fireValueChange();
	}

	public boolean registerIsEmpty() {
		return register == null;
	}

	protected void fireInputChange() {
		for (CalculatorListener listener : listeners) {
			listener.inputChange(input.toString());
		}
	}

	protected void fireValueChange() {
		fireValueChange(register);
	}

	protected void fireValueChange(Value value) {
		for (CalculatorListener listener : listeners) {
			listener.valueChange(value, operation);
		}
	}

	public void fireErrorChange(String message) {
		for (CalculatorListener listener : listeners) {
			listener.error(message);
		}
	}

	public boolean inputIsEmpty() {
		return input.length() == 0;
	}

}
1.2.2. Code - The Keyboard (UI and Controller)
Our keyboard is kept as simple as possible. Therefore I had to simplify the layout a bit. But at least the code stays very simple.
Often you will find the actual swing component to be it's own ActionListener , I prefer to use a dedicated anonymous inner class to do this. I also decided to keep the KeyboardController unaware of anything Swing - a clean design.
package be.ooxs.examples.designpatterns.observer.ui;

import java.awt.Component;

public class Keyboard extends JPanel {
	private KeyboardController controller = new KeyboardController();

	private ActionListener delegate = new ActionListener() {
		@Override
		public void actionPerformed(ActionEvent e) {
			controller.handle(e.getActionCommand());
		}
	};

	public Keyboard() {
		super(new GridLayout(0, 4));

		add(createButton("7"));
		add(createButton("8"));
		add(createButton("9"));
		add(createButton("+"));
		add(createButton("4"));
		add(createButton("5"));
		add(createButton("6"));
		add(createButton("-"));
		add(createButton("1"));
		add(createButton("2"));
		add(createButton("3"));
		add(createButton("*"));
		add(createButton("0"));
		add(createButton("."));
		add(createButton("="));
		add(createButton("/"));
		add(createButton("C"));
	}

	private Component createButton(String string) {
		JButton button = new JButton(string);
		button.addActionListener(delegate);
		return button;
	}

	public void useModel(CalculatorModel model) {
		controller = new KeyboardController();
		controller.setModel(model);
	}

}
In the case of a calculator, where you can only push a few buttons, little has to be done to check the input. Most logic has been included in the model - that makes it much easier to test.
package be.ooxs.examples.designpatterns.observer.ui;

import be.ooxs.examples.designpatterns.observer.CalculatorModel;

public class KeyboardController {
	private CalculatorModel model;

	public void setModel(CalculatorModel model) {
		this.model = model;
	}

	public void handle(String command) {
		try {
			if (command.matches("\\+|-|\\*|/")) {
				if (model.registerIsEmpty()) {
					model.enterA();
				} else if (!model.inputIsEmpty()) {
					model.enterB();
				}
				model.addOperation(command);
			} else if (command.matches("=")) {
				model.enterB();
			} else if (command.matches("C")) {
				model.clear();
			} else {
				model.add(command);
			}
		} catch (RuntimeException exception) {
			exception.printStackTrace();
			model.fireErrorChange("Error");
		}
	}
}
1.2.3. Code - Display the Results
For displaying the results, I have written two different "displays": Display a simple LCD like display that shows the current state of the calculator and PaperRoll represents the output on a paper tape, just because it is very different to the other display.
package be.ooxs.examples.designpatterns.observer.ui;

import java.awt.BorderLayout;

public class Display extends JPanel implements CalculatorListener {
	private JTextField displayLabel;

	public Display() {
		super(new BorderLayout());
		displayLabel = new JTextField();
		displayLabel.setEditable(false);
		displayLabel.setAlignmentX(JLabel.RIGHT_ALIGNMENT);
		displayLabel.setHorizontalAlignment(JTextField.RIGHT);
		add(displayLabel, BorderLayout.CENTER);
	}

	@Override
	public void error(String message) {
		displayLabel.setText(message);
	}

	@Override
	public void valueChange(Value register, Operation operation) {
		if (register != null) {
			String v = String.valueOf(register.getValue());
			displayLabel.setText(v);
		} else {
			displayLabel.setText("0");
		}
	}

	@Override
	public void inputChange(String string) {
		displayLabel.setText(string);
	}

}
package be.ooxs.examples.designpatterns.observer.ui;

import java.awt.BorderLayout;

public class PaperRoll extends JPanel implements CalculatorListener {
	private JTextArea textPane;

	public PaperRoll() {
		textPane = new JTextArea();
		textPane.setFont(new Font("monospace", Font.PLAIN, 10));
		this.setLayout(new BorderLayout());
		add(new JScrollPane(textPane), BorderLayout.CENTER);
	}

	@Override
	public void error(String message) {
		textPane.append("\n");
		textPane.append(message);
	}

	@Override
	public void inputChange(String string) {

	}

	@Override
	public void valueChange(Value register, Operation lastOperation) {
		textPane.append("\n");
		if (lastOperation != null) {
			textPane.append(lastOperation.getSymbol());
		}
		textPane.append("\t");
		if (register == null) {
			textPane.append("0");
		} else {
			textPane.append(register.getValue().toString());
		}
	}
}
1.2.4. Code - Helper classes
The Operation s represent and implement the basic arithmetic operations.
The Value is a very simple wrapper around a BigDecimal - we could leave it out, but in this way it is very simple to replace it e.g. with double , Integer or whatever you like. It just illustrates the power of encapsulation.
package be.ooxs.examples.designpatterns.observer;

import java.math.BigDecimal;

public class Value {
	private BigDecimal value = BigDecimal.ZERO;

	public Value(CharSequence input) {
		value = new BigDecimal(input.toString());
	}

	public Value(BigDecimal value) {
		this.value = value;
	}

	public BigDecimal getValue() {
		return value;
	}

	public void setValue(BigDecimal value) {
		this.value = value;
	}

}
package be.ooxs.examples.designpatterns.observer;

public abstract class Operation {
	public abstract Value calculate(Value first, Value second);

	public abstract String getSymbol();
}
package be.ooxs.examples.designpatterns.observer;

public class Add extends Operation {
	@Override
	public Value calculate(Value first, Value second) {
		return new Value(first.getValue().add(second.getValue()));
	}

	@Override
	public String getSymbol() {
		return "+";
	}
}
package be.ooxs.examples.designpatterns.observer;

public class Subtract extends Operation {
	@Override
	public Value calculate(Value first, Value second) {
		return new Value(first.getValue().subtract(second.getValue()));
	}

	@Override
	public String getSymbol() {
		return "-";
	}
}
package be.ooxs.examples.designpatterns.observer;

public class Multiply extends Operation {
	@Override
	public Value calculate(Value first, Value second) {
		return new Value(first.getValue().multiply(second.getValue()));
	}

	@Override
	public String getSymbol() {
		return "*";
	}
}
package be.ooxs.examples.designpatterns.observer;

public class Divide extends Operation {
	@Override
	public Value calculate(Value first, Value second) {
		return new Value(first.getValue().divide(second.getValue()));
	}

	@Override
	public String getSymbol() {
		return "/";
	}
}
1.2.5. Code - The Unit Testing
Of course, we will write some unit tests to verify our "business logic". A simple calculator can be surprisingly complicated...
Since our model communicates about it's state via the update methods of an observer, let us first implement a simple observer that keeps track of the last change only:
package be.ooxs.examples.designpatterns.observer;

import java.math.BigDecimal;

public class LastChangeListener implements CalculatorListener {
	private Value lastChangedValue;
	private String lastInputString;
	private String errorMessage;

	public LastChangeListener() {
	}

	public Value getLastChangedValue() {
		return lastChangedValue;
	}

	public BigDecimal getLastChangedBigDecimal() {
		return lastChangedValue.getValue();
	}

	public String getLastInputString() {
		return lastInputString;
	}

	public String getErrorMessage() {
		return errorMessage;
	}

	@Override
	public void error(String message) {
		this.errorMessage = message;
	}

	@Override
	public void inputChange(String string) {
		this.lastInputString = string;
	}

	@Override
	public void valueChange(Value register, Operation operation) {
		this.lastChangedValue = register;
	}

}
Next, we will test some simple facts about our model:
package be.ooxs.examples.designpatterns.observer;

import static org.junit.Assert.assertEquals;

public class UTestCalculatorModel {
	CalculatorModel model;
	LastChangeListener lastValueListener;

	@Before
	public void setUp() throws Exception {
		model = new CalculatorModel();
		lastValueListener = new LastChangeListener();
		model.add(lastValueListener);
	}

	@Test
	public void testSimpleCalculation() {
		model.add("123");
		model.add(".1");
		model.enterA();
		model.addOperation("+");
		model.add("56");
		model.enterB();
		assertEquals(new BigDecimal("179.1"), lastValueListener.getLastChangedBigDecimal());
	}

	@Test
	public void testChainedCalculation() {
		model.add("3");
		model.enterA();
		model.addOperation("+");
		model.add("5");
		model.enterB();
		model.addOperation("*");
		model.add("7");
		model.enterB();
		assertEquals("Expecting (3 + 5) * 7 = 56", new BigDecimal("56"), lastValueListener.getLastChangedBigDecimal());
	}
}
That didn't look much like we are used to think of a calculator.
Now we will test using our controller, since it is closely related to our keyboard input, the sequences are easier to understand.
package be.ooxs.examples.designpatterns.observer.ui;

import static org.junit.Assert.assertEquals;

public class UTestKeyboardController {
	CalculatorModel model;
	LastChangeListener lastChangeListener;
	KeyboardController controller;

	@Before
	public void setUp() throws Exception {
		model = new CalculatorModel();
		lastChangeListener = new LastChangeListener();
		model.add(lastChangeListener);
		controller = new KeyboardController();
		controller.setModel(model);
	}

	@Test
	public void simpleCalc() {
		controller.handle("2");
		controller.handle("+");
		controller.handle("3");
		controller.handle("=");
		assertEquals("expect 2+3", new BigDecimal("5"), lastChangeListener.getLastChangedBigDecimal());
		controller.handle("*");
		controller.handle("5");
		controller.handle("=");
		assertEquals("expect (2+3) * 5", new BigDecimal("25"), lastChangeListener.getLastChangedBigDecimal());
	}

	@Test
	public void simpleCalc_implicit() {
		controller.handle("2");
		controller.handle("+");
		controller.handle("3");
		controller.handle("*");
		controller.handle("5");
		controller.handle("=");
		assertEquals("expect (2+3) * 5", new BigDecimal("25"), lastChangeListener.getLastChangedBigDecimal());
	}

	@Test
	public void firstOperation() {
		controller.handle("+");
		assertNull("expect error message", lastChangeListener.getLastChangedValue());
		assertNotNull(lastChangeListener.getErrorMessage());
	}
}
1.2.6. Code - Running the Application
Now you might like to run the calculator. Here is a main method you can use to run the calculator.
For those not yet familiar with Swing, remark that "End of main method" is printed almost immediately: the Swing code runs in it's own event handling thread.
If you would uncomment the 8 lines for display3 and display4, you will get four displays instead of two, illustrating that the observer doesn't really have to care about how many and which implementations are observing it. Closing the application is done by closing the main calculator window.
package be.ooxs.examples.designpatterns.observer.ui;

import java.awt.BorderLayout;

import javax.swing.JDialog;
import javax.swing.JFrame;

import be.ooxs.examples.designpatterns.observer.CalculatorModel;

public class Application {
	private int dialogCounter = 1;

	public void start() {
		JFrame window = new JFrame("Observer Pattern Calculator");
		window.setDefaultCloseOperation(JFrame.EXIT_ON_CLOSE);
		window.getRootPane().setLayout(new BorderLayout());

		CalculatorModel model = new CalculatorModel();
		Display display = new Display();
		PaperRoll display2 = new PaperRoll();
		//		PaperRoll display3 = new PaperRoll();
		//		PaperRoll display4 = new PaperRoll();
		Keyboard keyboard = new Keyboard();
		model.add(display);
		model.add(display2);
		//		model.add(display3);
		//		model.add(display4);
		keyboard.useModel(model);

		window.getRootPane().add(display, BorderLayout.NORTH);
		window.getRootPane().add(keyboard, BorderLayout.CENTER);

		JDialog paperDialog2 = createPaperRollDialog(window, display2);
		//		JDialog paperDialog3 = createPaperRollDialog(window, display3);
		//		JDialog paperDialog4 = createPaperRollDialog(window, display4);

		window.pack();
		window.setVisible(true);
		paperDialog2.setVisible(true);
		//		paperDialog3.setVisible(true);
		//		paperDialog4.setVisible(true);
	}

	private JDialog createPaperRollDialog(JFrame window, PaperRoll display) {
		JDialog paperDialog = new JDialog(window, "Paper Roll " + (dialogCounter++));
		paperDialog.add(display, BorderLayout.CENTER);
		paperDialog.setDefaultCloseOperation(JDialog.HIDE_ON_CLOSE);
		paperDialog.setSize(200, 250);
		paperDialog.setLocation(dialogCounter * 200, dialogCounter * 20);
		return paperDialog;
	}

	public static void main(String[] args) {
		new Application().start();
		System.out.println("End of main method");

	}
}
